People splatter ingredients in a traditional kitchen in a variety of ways. These splatters include everything from aerated grease to simmering sauces.
Rushing the stirring process and handling containers frequently result in spills. That’s where the need for backsplashes comes in.
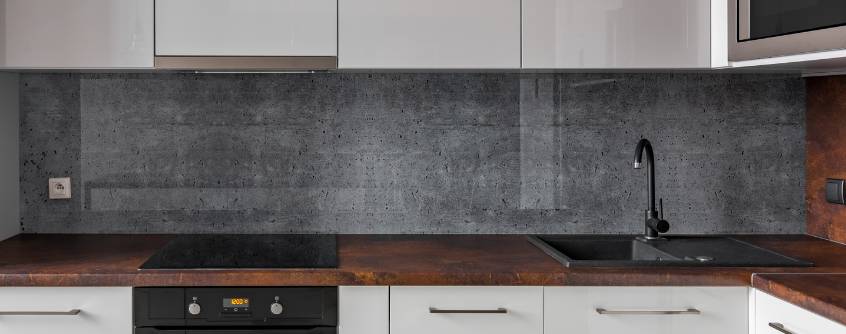
People mostly install these kitchen additions behind the stove, the cabinets, and the kitchen tile flooring. Choosing the right backsplash is as important as having one in the kitchen.
It’s easy to assume that a wallpaper backsplash is the least appropriate material for a kitchen backsplash. But if you look at its potential, you’ll discover that it also fulfills the functions of all the available kitchen backsplash materials.
Removable wallpaper, such as peel-and-stick, is a good wallpaper for kitchen backsplash – see more here. It gives renters a simple way to brighten up the drab backsplash walls left behind by previous residents.
This way, you can also avoid any consequences from the landlord, as it comes off easily and leaves no residue. In light of this, below are a few tips for wallpapering a backsplash in your kitchen.
1. Study And Prepare Your Kitchen Area
It’s important to know that every backsplash area is unique. You can encounter numerous obstacles in some areas and find it easy in others.
That’s why you must know everything about the kitchen area you want to put a wallpaper backsplash on. Ensure that you unplug any outlets and take off their covers.
In a space like a kitchen, it’s also vital to clean and degrease the surface.
Before installing a kitchen backsplash, you should patch up any holes or crevices in your wall. You can use spackling paste or call a professional to help you with this.
Next, you should sand any high points to create a flat surface. This will ease the installation of the kitchen backsplash.
2. Calculate Your Backsplash
Wallpaper can be pricey. That’s why before you begin cutting and peeling, you should take your time to precisely figure out how you will place the paper on your backsplash and other locations.
Cutting and measuring are also tricky tasks. So to avoid wasting expensive wallpaper, make a thorough layout of your entire backsplash.
Then, using scissors, cut the pattern out of this template, which could be two taped-together sheets of newspaper. Then cut the wallpaper to fit after tracing it with the template.
3. Create a Wallpaper Layout Plan

Once you fully calculate the dimensions, you may decide how to cut your wallpaper. Wallpaper is usually hung laterally across a room, from top to bottom.
Nowadays, most paper is produced to be hung vertically, making cutting and hanging considerably simpler.
So, be sure to buy wallpaper with a design that permits this. For example, a geometric pattern might work instead of wallpaper with good pictures of birds or fake masonry.
Also, carefully consider how you can apply the design and cut the paper to cover the most significant area with the least amount of paper.
4. Cut Your Wallpaper
Your most laborious and time-consuming stage is developing a concept for the wallpaper. But once you’ve calculated all the proportions, you must convert them to wallpaper and start cutting.
Make sure you face the large sections first. To begin, cut the vast rolls down to the approximate sizes specified in your planning.
Then, when you use a rotary cutter and a large ruler, you’ll see that making significant cuts is simple enough. Also, ensure the patterns match the adjacent panels before cutting any areas.
This tip is only needed if your backsplash area has any noticeable or unusual elements to work around. Then you can skip this step and simply hang your more important pieces of paper on the wall.
5. Apply The Wallpaper
Once you’ve cut out all the relevant details, it’s time to install the wallpaper strip. As we already inferred, you can hang your wallpaper horizontally to save paper and eliminate the extra match lines in such a tiny space.
Peel off a small section of the wallpaper’s paper backing from the top or side, depending on whether you apply the paper top to bottom or side to side.
Stick that leading edge to the wall, making sure it’s as straight as possible. Then, as you move across or down the wall, gradually remove the paper backing and smooth it off using a sizable paddle scraper.
Use a sharp craft knife to make the necessary notches to ease paper tension or remove the surplus paper as you approach edges, outlets, and corners.
Once the wallpaper is in position, smooth out any creases or bubbles by using the scraper to attach the paper to the wall.
6. Navigating Outlets
The new wallpaper will likely not match your previous outlet and switch cover plates. Spray painting them is one approach to integrating them, while individually covering each one with wallpaper is another.
Make sure the pattern on the cover plate and the one on the wall match if you use the wallpaper technique; otherwise, the cover plate will look even more out of place than it would if you did nothing.